
A Tutorial on Systematic Experimental Design
Step I. Single Node Software Installation and Custom Images
This experiment is step 1 in the multi-part tutorial on Systematic Experimental Design. The Systematic Experimental Design approach follows this sequence:

The goal is to setup a layer-3 virtual network with multiple virtual routers. Hence, the first step is to install the routing software `Quagga`. Older unsupported routing software is available, such as `XORP`. In this tutorial, we will install Quagga to enable routing functionalities on nodes.
Sometimes it may take a long time to install software on a node, so it is always good to start with one node to test out the whole installation process. The figure below provides an overview of the software installation to a VM. This process turns a generic VM into a software router that uses Quagga.

1. Reserve a VM with a Standard Image
Assume we have a slice created already. We want to reserve a Xen VM running a standard Ubuntu image as the basis of the software router.
a. Select a VM from an InstaGENI Site
Once you have created an image select the Add Resources button to reserve a virtual machine.

In the resulting "Add Resources" panel, drag and drop a Xen VM:

Now click on "Site 1" to select an InstaGENI aggregates, this will show the available sites in the left hand actions:

Choose any InstaGENI aggregate.

| Please go to HowToReserveVM for details on how to reserve a VM from an aggregate. |
b. Select a Standard Images
Click on the node to show the left-hand options panel that allows image selection. Click on Disk Image pull-down to see available standard images:

Select Ubuntu 14.04 LTS. You are now ready to reserve the VM, which is done by scrolling to the bottom of the Add Resources page and clicking on the Reserve Resources button:

Once selected, the results section will be updated to show the status for the request as it progresses:

c. Login to the VM
Once the VM sliver creation is completed, you can get status in slice page:

The resources are shown as green when ready.
You are able to login to the node from a terminal using ssh.
ssh username@hostname -p xxxxx
| You can find information on how to login to GENI hosts from HowToLogin. |
2. Customize Your VM
In this tutorial we will install Quagga on Ubuntu 14.04 with the following steps:
- Install Dependencies
sudo apt-get update
- Download Quagga source files
sudo apt-get install quagga
- Enable IPv4 and IPv6 Forwarding:
echo "net.ipv4.conf.all.forwarding=1" | sudo tee -a /etc/sysctl.conf
echo "net.ipv4.conf.default.forwarding=1" | sudo tee -a /etc/sysctl.conf
sed 's/#net.ipv6.conf.all.forwarding=1/net.ipv6.conf.all.forwarding=1/g' /etc/sysctl.conf | sudo tee /etc/sysctl.conf
echo "net.ipv6.conf.default.forwarding=1" | sudo tee -a /etc/sysctl.conf
sudo sysctl -p
- Create the configuration files:
sudo nano /etc/quagga/babeld.conf
sudo nano /etc/quagga/bgpd.conf
sudo nano /etc/quagga/isisd.conf
sudo nano /etc/quagga/ospf6d.conf
sudo nano /etc/quagga/ospfd.conf
sudo nano /etc/quagga/ripd.conf
sudo nano /etc/quagga/ripngd.conf
sudo nano /etc/quagga/vtysh.conf
sudo nano /etc/quagga/zebra.conf
- Change the owner and the mode of the configuration files:
sudo chown quagga:quagga /etc/quagga/babeld.conf && sudo chmod 640 /etc/quagga/babeld.conf
sudo chown quagga:quagga /etc/quagga/bgpd.conf && sudo chmod 640 /etc/quagga/bgpd.conf
sudo chown quagga:quagga /etc/quagga/isisd.conf && sudo chmod 640 /etc/quagga/isisd.conf
sudo chown quagga:quagga /etc/quagga/ospf6d.conf && sudo chmod 640 /etc/quagga/ospf6d.conf
sudo chown quagga:quagga /etc/quagga/ospfd.conf && sudo chmod 640 /etc/quagga/ospfd.conf
sudo chown quagga:quagga /etc/quagga/ripd.conf && sudo chmod 640 /etc/quagga/ripd.conf
sudo chown quagga:quagga /etc/quagga/ripngd.conf && sudo chmod 640 /etc/quagga/ripngd.conf
sudo chown quagga:quaggavty /etc/quagga/vtysh.conf && sudo chmod 660 /etc/quagga/vtysh.conf
sudo chown quagga:quagga /etc/quagga/zebra.conf && sudo chmod 640 /etc/quagga/zebra.conf
- Edit which routing protocols are to run:
sudo nano /etc/quagga/daemons
zebra=yes
bgpd=yes
ospfd=yes
ospf6d=yes
ripd=yes
ripngd=yes
isisd=yes
babeld=yes
- Edit telnet access and the retaining of routes over restarts:
sudo nano /etc/quagga/debian.conf
vtysh_enable=yes
zebra_options=" --daemon -A 127.0.0.1 -P 2601 -u quagga -g quagga"
bgpd_options=" --daemon -A 127.0.0.1 -P 2605 -u quagga -g quagga --retain -p 179"
ospfd_options=" --daemon -A 127.0.0.1 -P 2604 -u quagga -g quagga"
ospf6d_options=" --daemon -A ::1 -P 2606 -u quagga -g quagga"
ripd_options=" --daemon -A 127.0.0.1 -P 2602 -u quagga -g quagga"
ripngd_options=" --daemon -A ::1 -P 2603 -u quagga -g quagga"
isisd_options=" --daemon -A 127.0.0.1 -P 2608 -u quagga -g quagga"
babeld_options=" --daemon -A 127.0.0.1 -P 2609 -u quagga -g quagga"
- The Quagga vtysh shell starts with a mostly blank screen displaying the text “(END)”. To fix this problem, do the following steps:
- Login as root.
- Append the lines "export VTYSH_PAGER=more" at the end of /etc/bash.bashrc file.
- Logout as root and log back in.
- Restart the daemon:
/etc/init.d/quagga restart
3. Create a Custom Image
From the manual installation procedure to customize the VM, we learned that it is not efficient to manually install Quagga on multiple VMs. An alternative approach is to create a custom image of Ubuntu 14.04 LTS with Quagga pre-installed and save this custom image for future usage.
You can create InstaGENI custom images in the Slice page by selecting the Snapshot button:

Choose a custom image name that reflects its content and whether the image is visible to other GENI Users. Also note that the image name MUST include alphanumeric characters only.

Click on the Create button and you will get an update on the same page capturing image information :

The custom image is typically available within 10 minutes of the creation time. There is also an email notification for the image creation completion, but the notification email tend to be quarantined to IT mail systems.
| The custom image with Quagga pre-installed is available for use by any InstaGENI aggregate by using the url https://www.utahddc.geniracks.net/image_metadata.php?uuid=570dc911-2f2b-11e6-9a79-000099989701. This will allow you to skip the customization in Step 2 when using this newly defined custom image. |
Further details can be found at ManageCustomImageInstaGENI.
If your are going to use the same slice and aggregate in the next step, now it's time to release the Xen VM resource in the Slices panel:

If you are using Omni:
$ omni.py -a <aggregate name> deletesliver <slicename>
4. Verify InstaGENI Custom Image
Unfortunately when a custom image is created, the user account quagga and the group account quaggavty are deleted. Thus we need a script which recreates these accounts and assigns the required permissions to these accounts. The script for the quagga image used in this tutorial is available at https://github.com/GENI-NSF/geni-tutorials/raw/master/Quagga/install-script.tar.gz .
Now let's load the custom image created in Step 3 by requesting a new VM that uses that image:
- Select the Slice panel and then click on Add Resources button.
- Drag and drop a Xen VM node type to the canvas.
- Select any InstaGENI site.
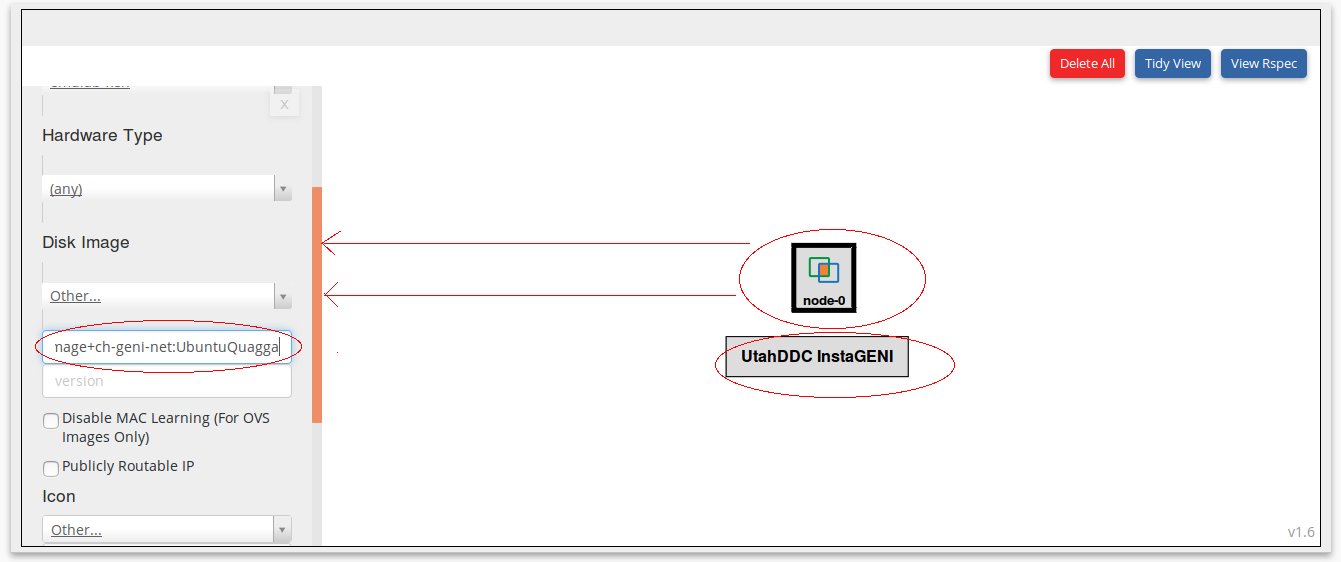
- Click on the node and then in the left-hand panel select the Disk Image pull-down and choose Other.
- In the URN slot paste your image url, in our example the image url is "https://www.utahddc.geniracks.net/image_metadata.php?uuid=570dc911-2f2b-11e6-9a79-000099989701"

- Scroll down till you see Install Tarball & click on the Add button.
- Enter https://github.com/GENI-NSF/geni-tutorials/raw/master/Quagga/install-script.tar.gz as the URL and the path /local in the Install Path.
- Click on the Add button in the Execute Command option.
- Enter sh /local/quaggainstall/ under Command.

- Scroll down to the bottom of the Add Resources panel and click on the Reserve Resources button.
- Go back to the Slice panel to monitor polling of the resource, which will take place every 5 seconds until the resource is ready.
Once the VM is ready to login, we can verify the Quagga installation.
pjayant@node-0:~$ sudo su
root@node-0:/users/pjayant# vtysh

Hello, this is Quagga (version 0.99.22.4).
Copyright 1996-2005 Kunihiro Ishiguro, et al.

node-0.test.ch-geni-net.utahddc.geniracks.net#
5. Cleanup the Slice
After verifying the Quagga installation, you can release the Xen VM resource in the Slices panel:
If you are using Omni:
$ omni.py -a <aggregate name> deletesliver <slicename>
Attachments (30)
- SingleNode.png (48.8 KB) - added by 10 years ago.
- portal-slice.png (73.7 KB) - added by 10 years ago.
- flack-alloc-vm.png (126.3 KB) - added by 10 years ago.
- flack-vm-property.png (74.4 KB) - added by 10 years ago.
- info.jpg (3.1 KB) - added by 10 years ago.
- flack-vm-customimage.png (117.7 KB) - added by 10 years ago.
- flack-load-customimage.png (104.1 KB) - added by 10 years ago.
- softwareinstall-flow.png (34.3 KB) - added by 10 years ago.
- flack-submit.png (3.7 KB) - added by 10 years ago.
- apply.png (2.9 KB) - added by 10 years ago.
- AddResources.jpg (65.8 KB) - added by 8 years ago.
- DragXen.jpg (100.0 KB) - added by 8 years ago.
- SelectSite.jpg (79.4 KB) - added by 8 years ago.
- ClemsonSite.jpg (40.4 KB) - added by 8 years ago.
- SelectDefaultImage.jpg (149.9 KB) - added by 8 years ago.
- ReserveResources.jpg (17.5 KB) - added by 8 years ago.
- CreateStatus.jpg (572.5 KB) - added by 8 years ago.
- SliverStatus.jpg (403.7 KB) - added by 8 years ago.
- snapshot.jpg (78.8 KB) - added by 8 years ago.
- CustomName.jpg (205.8 KB) - added by 8 years ago.
- ImageInfo.jpg (183.4 KB) - added by 8 years ago.
- DeleteSliver.jpg (264.8 KB) - added by 8 years ago.
- ImageURN.jpg (101.2 KB) - added by 8 years ago.
- QuaggaInstall.png (22.8 KB) - added by 8 years ago.
- CreateCustomImage.png (41.4 KB) - added by 8 years ago.
- ImageURN.png (14.2 KB) - added by 8 years ago.
- SelectSite.png (20.0 KB) - added by 8 years ago.
- DiskImage.png (37.4 KB) - added by 8 years ago.
- CustomImage.png (39.0 KB) - added by 8 years ago.
- InstallScript.png (68.4 KB) - added by 8 years ago.